The Woodwork of a Craftsman Bungalow
I've noticed that there is a fair amount of new construction around town that borrows from the old Craftsman style. Although the facade of these houses may have the odd triangle knee brace or square column, the interiors I've seen lack the great old Craftsman woodwork. To me, that's the difference between a Craftsman house and all others. It's the woodwork that I remember from the houses in the Irvington neighborhood that I grew up in. Now this is my burden. As I try to "recreate" an old Craftsman house, I now understand why new construction doesn't have so much of the old detailed woodwork. Labor.
For the past few months, I've done nothing but try and add the Craftsman style woodwork. It's a lot of work and it is going to take me many more months. It doesn't help that I'm not trained as a finish carpenter, that I never even worked with hardwoods before, and that my employer still expects me to work full-time. So, I work on the woodwork most weekends and many evenings. I trial. I error. And, slowly I see signs, things I recognizes from the old neighborhood. The interior is starting to look, well, Craftsman. This is encouraging. I seem to be on the right path.
What have I learned? 1/4" oak plywood makes for nice wainscoting panels. Always pre-drill solid oak before hammering a finish-nail. Minwax's "Red Oak" stain on oak creates a nice dark reddish-brown that reminds me of old houses. Left-over floor finish works on vertical surfaces too. But, the most important thing I've learned is that it takes a lot of time, practice, and patience to recreate Craftsman woodwork.
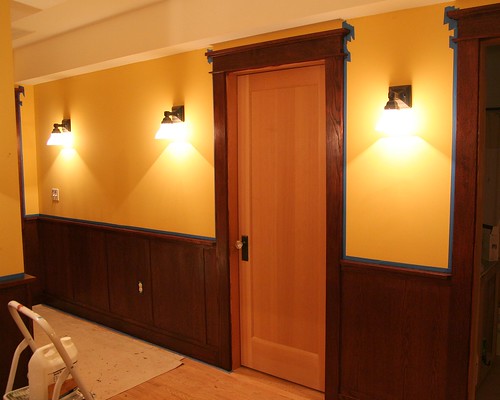
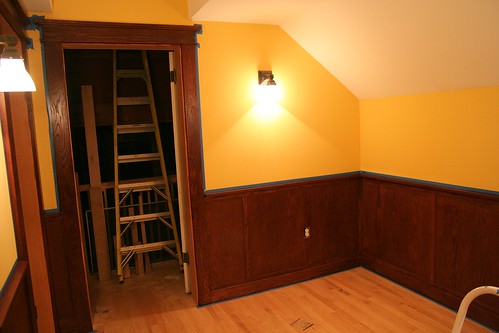
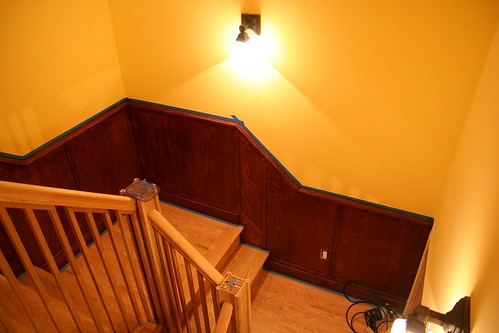
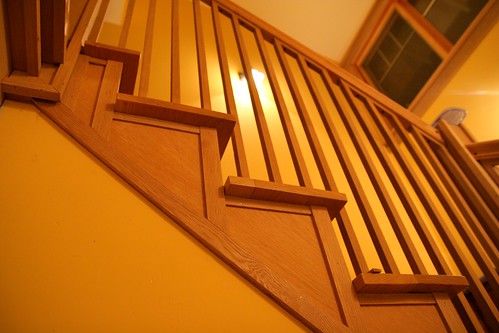
A week ago I stained the upstairs wainscoting. Some pictures are below. Up next, I'm returned to the main stairs to get the them prepared for staining and finish. They will get the same color as the wainscoting. After the stairs, I hope to get to the woodwork in the master suite. I need to get this done by May as we are expecting a new resident here in Hillsdale house by then.

posted by Greg at Sunday, December 03, 2006
![]()
![]()
NOTE:Comments that appear to promote commercial web sites will be deleted.
20 Comments:
That is very very pretty. I love the way it looks.
What color is the paint you used on your wall? I love the color
Thanks Patricia and Peter.
The walls are "Cain" from Miller Paint.
Looks beautiful. It looks like it's always been there.
As we start thinking more and more about the finish work for our house, we are beginning to struggle with trying to recreate that "old" look in a new house...and trying to stay within budget. Quite a challenge, as you know.
You've done amazing work. It is beautiful. And congratulations!
Wow, very nice finish work.
Bravo!
Thanks All!
Cherie, surprisingly this isn't all that expensive. White oak is about $3.50/bf and the 4'x8' sheets of plywood are around $36. I'd guess the wainscoting cost me less than $200. But, it does take a while, especially if you are inexperienced like me. I guess it would cost thousands to have a pro do the work...
The entire downstairs of my house was stripped of it's original woodwork and although I won't be replacing it for some time I like to find out exactly how people accomplished their incredible results and I think your results are really incredible. First, what did you do to prep the wood prior to staining other than sanding and second, how was the stain applied? Third, did you seal the wood after the stain? If so, what with? I'm serious, I really love the way this looks and it gives me lots of hope for when I get busy on the downstairs portion of our reno. Thanks for all of your time.
Hey Patricia. This is what I did, but it comes with no guarantees that it is 100% the right way to do it. Also, keep in mind this is oak, not fir or hemlock, both soft woods. First, I sanded with a palm sander using 100 grit, rather than 220 (the coarser grit is supposed to allow for a darker stain). Then I wiped the wood down with a damp rag (you’re supposed to use distilled water, but I used filtered tap water). Once the wood was completely dry, I brushed on the oil-based stain as thinly as I could, waiting about a half-hour before wiping off the excess. Then I brushed on a water-based sealant that was left over from finishing our floors (water based sealants add no color, while oil-based are slightly yellow). Then I added a coat of regular polyurethane, sanded lightly by hand (no palm sander), then a final coat of poly. The result is surprisingly smooth and fairly even in color. Hope this helps.
Greg,
Thank you so much for taking the time with all of the information. I'm copying what you wrote and putting it in my house folder for future reference.
You're welcome Patricia. Hope it works out for you. Also, I would recommend the latest issue of Fine Homebuilding, which has a great article on finishing wood floors that I think applies to woodwork too. Good stuff!
http://www.taunton.com/finehomebuilding/pages/fh_184_060.asp
I just stumbled across this blog, and I wanted to thank you, Greg, not just for taking the time to share this with us, but also for creating a house that will be loved by generations of Portlanders after you and Jenn.
I agree with you that interior finishes are where it's at. I spent a year building an oak and granite fireplace surround, learning how to do it as I went. I don't regret a minute of it (although at the time, I felt like Jenn does: I was tired of living in a house that was always under construction.)
As for the kitchen move: go for it. In many ways starting from scratch in a new space will make it easier. I'm assuming that you have access through the basement to the area under the old dinning room floor for plumbing; if not the placement of the fixtures will be much more restricted. Electrical is pretty easy, assuming that you can get above or below. It might be worth getting an electrician to put in a sub-panel near the new kitchen, and then you could do the wiring yourself — you will need permits, and it will be inspected, but this is good!
Thanks Andrew! Kind words.
Hi, Greg,
We're working on a 1903 house in eastern Kansas. It's not quite a bungalow -- the porches do not have peaked roof lines -- but will look more like one when we get finished! I'd like to know how you created your woodwork. I see a thin line of something across the top of the door frames. Is that 1/4" oak placed between larger boards?
Iris, yes that's there is a piece of 1.5"x0.25" trim that's both above and below the 1x4.
Nice work, exactly the same thing I am doing to our house. Can you tell me how you did the paneling? I have been reading and it seems there are quite a few ways of building it.
Thanks
Hmm, I'm not exactly sure what you're asking. I can say that it is 1/4" white oak plywood. I nail them up with 4p brads. Then, I cover that with the 1/4" solid oak trim, which gives it the panel-n-frame look. Very simple. Hope this helps.
Hi Greg,
That came out really nice. I would like to offer you to take a look at my staircase and wainscot for a similar but different perspective at http://CraftsmanRemodel.com
Just go into the Interior Finish pictures of the Photo Gallery.
Hi, we love what you have created. A few questions - did you just sand the edges of the casing to get the slightly rounded look I remember from my childhood and what are the dimensions of the various pieces you used for the header and baseboards? Thanks so much for sharing. Bonnie
I get asked this all the time, I really should create a new post with a link on the front page. Here is a copy/paste from another comment. I hope this helps.
The wainscoting is 3ft high. The rail (or header) at the top sticks out 1.5". The baseboards throughout the house are 1x4" as are most door and window casings. The casing headers are actually 4 pieces of wood glued together: 1X2, 1.5X0.5, 1X4, 1.5X0.5.
In general, all "one inch" stock is actually 13/16" cut wide to 1", 1.5", 2", 3", or 4". The panels are 1/4" ply and the framing here uses 1/4" by 1.5" stock.
I hope this helps, Bonnie.
Oh, and I don't round the edges. I might blunt the edges slightly with a palm sander, but not much.
Post a Comment
<< Home